Planting Care & Guides
Quick Planting Guide
- Dig a well-prepared hole: The hole should be twice as wide and as deep as the plant's container or bareroots. A bowl-shaped hole allows for better root establishment.
- Amend the soil: Mix in any necessary starter fertilizer or soil amendments to improve nutrient content.
- Loosen the soil: Break up any large clumps of soil to ensure good drainage and root penetration.
- Remove the plant: Gently remove the plant from its container by grasping the base and squeezing lightly.
- Tease apart roots: Carefully loosen any tangled or circling roots by gently massaging the root ball. Avoid damaging the main, larger roots.
- Position the plant: Place the plant in the hole, ensuring the root spread outwards and the crown is at the same depth as it was in the container.
- Backfill the hole: Fill the hole with soil, ensuring there are no air pockets. A second person can help hold the plant while backfilling.
- Firm the soil: Gently tamp down the soil around the plant to secure it without compacting it. The plant should stand upright without support and not move when watered.
- Water thoroughly: Water the area deeply, about 3 inches down, to establish the roots.
- Apply mulch: Add a layer of mulch or groundcover, such as straw or weed cloth, to suppress weeds and retain moisture. The mulch should be 2-3 inches thick and kept away from the base of the plant.
Remember: The specific planting needs may vary depending on the plant species and local conditions.
Gardeners have a saying about planting perennials: “The first year, they sleep; the second year, they creep; and the third year, they leap.” The best tip for successful planting is simple, “Right plant, right place.” If you want a perennial to survive and grow, the plant must tolerate year-round conditions in your zone including lowest and highest temperatures, the amount of rainfall it receives and appropriate amount of sunshine. For example, if you are in Zone 5 - any plant that is Zone 5, 4, 3, 2 and 1 could be a perennial in your area. Plants rated only for zone for 6 or higher hardiness should be considered as an annual. Specific areas of your yard may be hot spots and tolerate one zone higher.
We hope you use the following information as a starting point, recognizing that growing practices vary from region to region. What works for one gardener does not always work for the next as there are countless variables that enter into the equation.
When your plant arrives, remove from the shipping box immediately. If any roots are frozen (some varieties are on occasion stored in coolers), allow to thaw slowly before handling.
If it is a potted plant, immediately unpack, discard any packing material clinging to the leaves or soil. Cut any netting away, pulling the netting off may cause damage to foliage. Place them in an environment conducive to their needs and/or weather conditions and water thoroughly. If you cannot plant it within a few days, place the flat in a lightly shaded, protected area and water regularly.
If it is a bare root plant (no soil around the roots and trimmed leaves), plant bare roots as soon as possible. Immediately unpack, discard any packing material. Light surface mold is not unusual. This is generally harmless and does not affect plant performance. A preventative fungicide is unnecessary unless the variety is prone to fungal diseases.
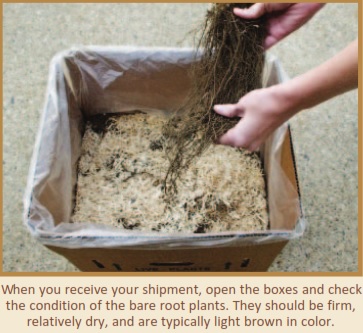
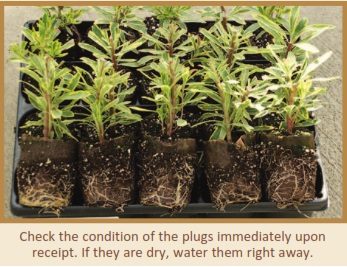
Soaking bare roots in water for at least 15 minutes is suggested.
If you are unable to get your new plants in the ground quickly, unwrap the plants to determine if the roots are still moist. If the roots appear dry, soak them in tepid water for at least 15 minutes. Store in a cool, dry area. Do not let plants freeze. Be very careful to ensure there is no moisture on any leaves. Repeat every couple of days. until you are ready to plant it in the ground. If planting is delayed, heel them into a temporary bed. Dig a trench, lay the plants at a 45 degree angle, with roots in the trench, cover the roots with loose soil, and water well.
When you are ready to plant it, do the job as early in the day as possible. Overcast, slightly cool weather is ideal, but you can always add some temporary shade if the sun is hot. Even sun-loving plants appreciate a little shade their first few days in the ground.
 Add organic matter at every opportunity!
Adding amendments such as humus or compost at planting time is critical, but nutrients leave the soil over time, and need replenishment. Nearly all plants grow better in soil that retains moisture, drains well, and is fairly fertile. Continually work your soil and plants will grow to their fullest potential. If you are creating a new bed, till the area to a depth of about 10 inches, add a few inches of compost (typically 25% by volume), and till again. If you are planting in an established bed, work compost into the top 6 to 8 inches of soil.
Until a well balanced, aged compost bed is established, incorporate a complete fertilizer like 10-10-10 into the bed at planting. For maximum growth, a high nitrogen fertilizer like 16-4-8 may be applied every 4 to 6 weeks after planting, beginning in early spring through summer. In early fall and winter, apply 5-10-15 at recommended rate.
Caution: Too much commercial fertilizer can "burn" plant roots.
Potted plants
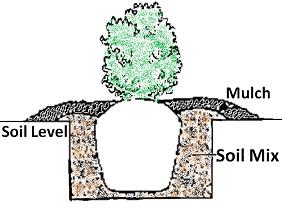
- A) Dig the hole. The hole should be dug at a depth so that 1/8 of the rootball will sit above the ground. Planting deep is a major cause of plant death. The hole should be twice as wide as the rootball.
B) If bed has not been amended, a s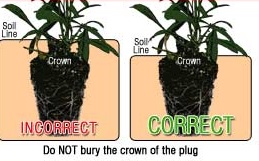 oil mixture of 25% to 30% compost mixed with dirt removed from the hole is generally recommended. Do not use topsoil as a soil conditioner. Mix thoroughly.
 - Carefully remove the plant from its plastic pot. If it is an Ellepot, the biodegradable paper sleeve is environmentally friendly and will decompose. Always handle the plant by its rootball. If root bound, loosen and spread roots.
- Make sure the plant is standing straight. Fill the hole with the soil mixture; by hand, pack down the soil. Do not put soil on top of the rootball.
- Mulch around the base of the plant. The mulch should be 2 to 3 inches deep. Be sure to pull the mulch away from the plant base to prevent disease and insect damage, especially in the South.
- Water the plant slowly and thoroughly.
- Prune any broken stems and branches.
The Ellepot paper holds the growing medium together, thereby protecting the roots and naturally degrades once planted, there is no need to remove the paper during planting. Planting Elle plugs -
Planting — Plugs are easy to transplant by hand. Gently grip the plant by the crown, and slowly lift the plug out of the tray. The air space between the paper sleeve and the tray makes the plug much quicker and easier to transplant than traditional plugs.
The Paper Sleeve — The paper sleeve around the plug will degrade naturally when it is potted up into a larger container, so there is no need to remove it. It makes transplanting much easier and also helps to maintain the integrity of the root ball. This results in less transplant shock and more uniform growth for the plants.
Potting Soil — Use a well-drained potting soil which contains 40%-60% bark content.
Planting level — When planting Elle Plugs, the top of the Elle Plug should be about ¼” below the soil line.
The root ball of the twenty count flat Elle plug is 2.75" wide and 3.25" tall. The root ball of the thirty count flat Elle plug is 2" wide and 3" tall. The size of the plants of both sizes depends on individual plant characteristics.
Bare Root Planting Instructions
- Place just the roots in water to soak for one to four hours
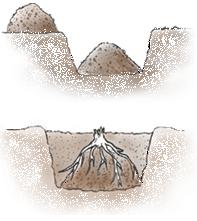 A) Dig shallow, wide planting hole. The hole should be almost twice as wide as the root system and about as deep as the roots are long. Planting deep is a major cause of plant death.
B) If bed has not been amended, a soil mixture of 25% to 30% compost mixed with dirt removed from the hole is generally recommended. Do not use topsoil as a soil conditioner. Mix thoroughly.- Mound soil in the bottom of the hole so that the peak reaches just about ground level
- Set the plant so the crown (the part between roots and where stems will emerge) sits at or just below the soil line. Spread the roots so they cascade over the mound. Backfill with soil mix; by hand, pack down the soil.
- Make sure the plant is standing straight and the crown is in proper position to soil level.
- Mulch around the base of the plant. The mulch should be 2 to 3 inches deep. Be sure to pull the mulch away from the plant to prevent disease and insect damage, especially in the South.
- Water slowly and thoroughly.
- Prune any broken stems and branches.
Keep plants watered during their first season, even drought tolerant plants. A weekly deep soaking will encourage the root system. It is best to water early in the day, giving foliage a chance to dry out before evening hours - to reduce disease possibilities and crown rot. Apply a layer of compost each spring to provide nutrients and maintain soil health. Beyond that, most perennials need little supplemental fertilizer.
- Agastache - Crown should be planted even with soil line.
- Allium - Place crown just at or slightly below soil level.
- Amsonia - Place the crown about one half inch below the soil surface.
- Aquilegia - Place crown at soil level.
- Artemisia - Place crown just below soil line.
- Asclepias - Plant 'high' so crown protrudes above soil line for bare root.
- Astilbe - Plant astilbe so the crown of the plant sits just below the soil line.
- Baptisia - Plant crown just below soil surface for bare root.
- Belamcanda - Plant bare root tubers slightly below the soil line.
- Buddleia - Plant so the crown is at least an inch above the normal soil level. Mound some of the soil up around the crown to create a small hill that slopes away from the plant to assist water drainage.
- Calamagrostis - Plant the crown level with the soil line.
- Campanula - Plant the crown level with the soil line.
- Clematis - Dig a hole that is deeper than the root ball, and then position the plant’s crown about 2" below the soil line.
- Convallaria - Dig a hole deep enough for the roots and situate the plant with the crown about an inch below the soil surface.
- Coreopsis - Plant the crown level with the soil line.
- Crocosmia - 3-6 inches below soil line.
- Delphinium - Place crown at or just below soil surface.
- Dicentra - Place the crown of the plant about 1” below the surrounding soil.
- Echinacea - Plant crown even with the soil line.
- Echinops - Plant bare root with the crown at the soil line.
- Epimedium - Crown should be planted slightly below soil line.
- Eucomis - Plant the bulb 2.5 times the depth of the bulb.
- Euphorbia - Crown should be planted even with soil line.
- Geranium - Bare root crown slightly below soil line.
- Gypsophila - Place crown at or slightly higher than the soil level.
- Helictotrichon - The crown (where the roots meet the plant) should be just slightly below the soil line.
- Heliopsis - Plant crown even with soil line.
- Hemerocallis / Daylilies - Set the daylily in the hole with the crown of the plant is 1” below the soil line.
- Hibiscus - Crown should be at or just above soil level.
- Hostas - Position the crown 1” below the natural soil line.
- Iberis - Place crown just below soil surface.
- Iris - Plant the crown about an inch below the soil surface. When planting bearded iris, the rhizomes should be positioned horizontally and remain partially exposed to the sun. For other types, position the crown of the plant about 1½” below the soil surface. Bulbs should be planted 4 to 5” deep, depending on type.
- Kniphofia - Position the crown at or just slightly below the soil line. If the crown is planted too deeply it will be vulnerable to rot.
- Lagerstroemia - Plant crown even with soil line.
- Liatrus - Plant bare root corms with the top right at the soil surface, just barely covered with soil.
- Ligularia - Plant crown even with soil line.
- Monarda - Plant crowns at soil level or just below.
- Nepeta - Place crown of plant just below soil level.
- Pennisetum - Place crown at the soil level.
- Peonies - Set peony root in the hole so the eyes (the growing tips) are positioned no more than 1” below the soil line. When peonies are planted too deeply, the plants will grow but may refuse to bloom. Cover the root with soil and water as needed.
- Perovskia - Plant bare root crown slightly below soil line.
- Phlox - Place the crown at the soil line.
- Platycodon - Tap root needs to be planted high. The upper bulkier part of the root should protrude about 1 inch above the soil line once the soil settles.
- Polygonatum - Eyes should be slightly below the soil line.
- Rudbeckia - Place crown just below soil surface.
- Salvia - Plant crown even with soil level.
- Sedum - Place crown just at or below soil level.
- Sempervivum - Place crown at soil level.
- Sisyrinchium - Place crown at soil level.
- Thymus - Plant bare root with foliage on the top of the soil and fine root system underneath.
- Tradescantia - Plant crown slightly below the soil line.
- Veronica - Place bareroot at soil level or slightly higher.
- Yucca - Plant with the crown at soil line. Tubers should not be exposed.
Plants to Grow Dry
Aquilegia, Amsonia, Asclepias tuberosa, Centaurea, Corydalis, Dwarf Iris, Echinacea, Gaura, Iberis, Lavandula, Lewisia, Lupines, Oenothera, Perovskia, Platycodon, Stachys, Verbascum, and Yucca. It is very important to water these varieties infrequently. Plant the above varieties in a well-drained media, water in thoroughly after planting; water lightly thereafter.
Plants to Grow Wet
Acorus, Astilbe, Cimicifuga, Dicentra, Iris ensata, Iris pseudacorus, Iris sibirica, and Trollius. These plants are unforgiving if allowed to dry out. Leaves will scorch and regrowth will be slow.
Deadheading- Pinching and pruning perennials will help keep them attractive and encourage rebloom.
After poor bed preparation and / or planting, the four (4) most common plant issues -
Too little fertilizer
Too much fertilizer
Too little water
Too much water
Not sure how many plants are needed?
Click here for the Plant  Calculator.
Immediately upon arrival:
- Unbox them promptly: Do not leave your plants trapped in their dark container for longer than necessary. Carefully remove all packaging materials and inspect the plants for any damage.
- Hydrate them: Check the soil moisture. If it is dry, give your plants a good soak until water runs out the drainage holes. Avoid overwatering.
- Give them a rest: Plants go through stress during shipping. Place them in a warm (above 65°F), well-ventilated area with indirect sunlight for 24-48 hours. Avoid drafts and cold windows.
- Clean up: Gently remove any yellow, damaged, or dead leaves.
After the initial rest:
- Research specific care needs: Every plant has unique needs. Identify your plants and research their specific requirements for light, water, humidity, and fertilizer.
- Consider repotting (later): Wait at least 2 weeks, preferably until spring, before repotting. This allows your plants to adjust to their new environment. When repotting, choose a pot with good drainage and only go up one size.
- Introduce them to their permanent location: Gradually introduce your plants to their intended location, starting with shorter periods and eventually full placement. Avoid sudden changes in light conditions.
- Monitor and adjust: Keep an eye on your plants and adjust their care as needed. Watch for signs of stress like wilting, drooping, or leaf discoloration.
Additional tips:
- Do not fertilize immediately after arrival. Let your plants settle in first.
- Check for pests or diseases upon arrival and treat them promptly if necessary.
- Consider using a humidifier to increase humidity, especially for tropical plants.
- Be patient! It may take some time for your plants to fully adjust to their new home.
Remember, these are general guidelines. It is always best to research the specific needs of your mail order plants to ensure they thrive in your home. Good luck with your new green friends!
The steps you take after receiving your bare root plants depend on a few factors:
1. Can you plant them immediately?
- Planting ASAP is ideal: If the ground is not frozen and conditions are suitable for planting in your area, get those roots in the ground! This is especially true for trees and shrubs.
- Delayed planting: If planting right away is not possible, you can store them temporarily. However, the sooner you plant, the better.
2. How long can you store them?
- Short-term (up to a week): Keep the roots moist by wrapping them in damp paper towels or burlap and placing them in a cool, dark location like a garage, shed, or unheated basement. Aim for temperatures around 40°F, but anything under sixty°F should work for a short period.
Here are some general steps for caring for your bare root plants upon arrival:
- Inspect the plants: Check for any damage or signs of disease. If you see anything concerning, contact the seller immediately.
- Hydrate the roots: If planting is not immediate, soak the roots in water for several hours before storing or planting. Aim for water temperature around 50°F.
- Prepare the planting site: While your plants soak or store, choose a suitable planting location with appropriate soil conditions and sunlight needs. Dig the hole according to the plant's specific requirements.
- Plant carefully: When planting, spread the roots out evenly and ensure the root flare (where the roots meet the stem) sits slightly above the soil level. Backfill the hole with loosened soil and water deeply.
- Provide proper care: Water regularly, especially during the first few weeks, and follow any specific care instructions provided by the seller. Mulch around the base of the plant to retain moisture and suppress weeds.
Additional tips:
- Acclimate outdoor plants: If storing indoors, gradually introduce them to outdoor conditions before planting to avoid transplant shock.
- Prune if needed: For some plants, light pruning before planting can encourage new growth. Research the specific needs of your plants.
- Be patient: Bare root plants may take some time to establish themselves, so be patient and provide consistent care.
For more specific guidance, remember to consider the type of bare root plants you received and research their individual planting and care requirements. Happy planting!
Preparing your flower garden for planting involves several steps to ensure healthy and vibrant blooms. Here is a breakdown of the key steps:
1. Assess your garden:
- Location and size: Consider how much sunlight the area receives, existing structures, and the desired size of your flower bed.
- Soil quality: Perform a soil test to determine pH, drainage, and nutrient levels. This will help you decide if amendments are needed.
- Existing plants: Remove any unwanted weeds, debris, or previous season's plants.
2. Clear and amend the soil:
- Remove weeds: Use a hoe, hand tools, or herbicides (carefully!) to eliminate weeds and their root systems.
- Turn the soil: Loosen the soil to a depth of 8-12 inches with a shovel or tiller. This allows for better root growth and drainage.
- Amendments: Based on your soil test, add compost, aged manure, or organic matter to improve fertility and drainage. Aim for a 2–3-inch layer mixed into the topsoil.
3. Plan your layout:
- Choose plants: Select flowers based on their sunlight, soil, and moisture requirements, blooming times, and desired colors and heights. Create a visual plan to ensure proper spacing and variety.
- Plant spacing: Follow the recommended spacing on plant labels or garden guides to avoid overcrowding, which can hinder growth and airflow.
- Consider edging: Edging your flower bed with bricks, stones, or wood helps define the area and prevent grass or weeds from encroaching.
4. Planting and finishing touches:
- Dig planting holes: Ensure the holes are deep and wide enough to accommodate the root balls of your plants.
- Planting technique: Carefully remove plants from their pots, tease out any tightly bound roots, and place them in holes slightly higher than the original soil level. Gently firm the soil around the base.
- Water thoroughly: Water each plant deeply after planting to settle the soil and hydrate the roots.
- Mulch: Apply a 2–3-inch layer of organic mulch around your plants to retain moisture, suppress weeds, and regulate soil temperature.
Additional tips:
- Start small and expand your garden gradually over time.
- Group plants with similar watering needs together for efficient watering practices.
- Consider incorporating climbing vines or trailing plants for added visual interest.
- Regularly deadhead spent blooms to encourage further flowering.
Remember, these are general guidelines. Adapt them to your specific garden conditions, chosen plants, and personal preferences. With proper preparation, your flower garden will flourish and bring you joy for seasons to come!
With a little planning, you can choose the perfect perennials to create a beautiful and functional location solution for your garden. There are many different varieties of perennials that can be used as location solutions, depending on your specific needs. Here are a few popular options:
Perennial gardens offer long-term beauty, requiring less upkeep than annuals once established. Careful planning and plant selection can result in a vibrant, year-round display. While perennials generally need less water and are less susceptible to pests, individual care will vary. Most importantly, a garden should reflect your personal style. There's no one-size-fits-all approach to garden design.
